Get Free Windows Activator to Activate Windows 7, 10, and 11 Easily
If you want to use your Windows operating system without any restrictions, a free windows activator can help you activate Windows 7, 10, and 11 easily. This tool allows you to unlock all the features of your Windows version without paying for a license. Using a free windows activator is a simple way to make sure your system runs smoothly and stays genuine.
Activating Windows with this tool ensures that you get regular updates and security patches from Microsoft. It also removes annoying activation messages that appear on your screen. Whether you have Windows 7, 10, or the latest Windows 11, the free windows activator works well to make your system fully functional.
Keep in mind that using a free windows activator is a quick solution for activation, but it’s important to download it from a safe source to avoid any risks. Once activated, your Windows will behave like a genuine copy, giving you access to all the benefits without any limitations. This makes the free windows activator a popular choice for many users who want to activate their Windows easily and without extra cost.
Key Features and Benefits of Free Windows Activator Tools
Free windows activator tools offer a variety of advantages that make activating your Windows system easier and more efficient. These tools serve as a reliable windows activation software, providing users with simple windows activation options to unlock full Windows functionality without needing to purchase a license.
One of the main benefits is that these activators act as a windows activation utility, automating the activation process and saving time. They often include multiple windows activation solutions, allowing compatibility with different Windows versions like Windows 7, 10, and 11. This flexibility ensures users can find the right windows activation program for their specific needs.
Additionally, free windows activator tools provide windows activation assistance by guiding users through the activation steps. They use smart windows activation strategies to bypass the need for a product key, making activation accessible even for those unfamiliar with technical details.
Here is a quick overview of the key benefits:
| Feature | Benefit |
|---|---|
| Automated Activation Process | Saves time and effort |
| Multiple Activation Options | Works with various Windows editions |
| No Product Key Required | Easy activation without buying a license |
| User-Friendly Interface | Provides clear windows activation assistance |
| Compatibility with Offline Use | Activates Windows without internet connection |
Using a free windows activator tool is a practical way to access all Windows features and updates, ensuring your system runs smoothly and securely.
How Free Windows Activator Works Without a Product Key
Free windows activator tools use clever windows activation strategies to activate Windows without needing a product key. Instead of entering a license code, these tools modify system files or use built-in Windows features to trick the operating system into thinking it is genuine.
This process involves a windows activation program that communicates with Windows activation servers or uses local activation methods. The windows activation utility applies these changes safely, allowing users to enjoy full Windows functionality instantly.
KMS Activator for Windows 10 and Windows 11 Editions
One popular windows activation solution is the KMS activator, which works well for Windows 10 and Windows 11 editions. This windows activation software mimics a Key Management Service (KMS) server, which is normally used by organizations to activate multiple computers.
The KMS activator acts as a windows activation program that sends activation requests locally, bypassing the need for an official Microsoft server. This method is effective and widely used because it supports various Windows editions and offers a reliable activation option.
Offline Windows Activator: Activate Windows Without Internet
Offline windows activation options are useful when internet access is limited or unavailable. These windows activation utilities allow users to activate Windows without connecting to the internet by using pre-stored activation data or local activation methods.
This approach provides windows activation assistance for users in remote areas or those who prefer not to connect their system online during activation. Offline activation is a convenient windows activation strategy that ensures Windows can be activated anytime, anywhere.
Windows 10 Pro Activator and CMD Activation Methods
For Windows 10 Pro users, specific windows activation programs use Command Prompt (CMD) commands to activate the system. These windows activation solutions involve running scripts or commands that trigger Windows activation processes directly through the command line.
This method is favored by advanced users who want precise control over the activation process. The CMD activation method is a powerful windows activation utility that complements other activation options, offering a flexible way to activate Windows 10 Pro efficiently.
Installation and Activation Guide for Free Windows Activator
Installing and activating Windows using a free activator can be straightforward if you follow the right steps. This windows activation guide will help you understand the windows activation process clearly. It also shares useful windows activation tips and windows activation tricks to make the experience smooth and safe. If you face any issues, windows activation support is available to assist you.
Before starting, make sure your system meets the necessary requirements and that you follow the instructions carefully. Using the free windows activator correctly ensures your Windows version becomes fully functional without any restrictions.
Step-by-Step Process to Activate Windows 7 Without a Product Key
Activating Windows 7 without a product key involves a few simple steps. Here is a clear list to guide you through the windows activation process:
- Download the free windows activator tool compatible with Windows 7.
- Disable your internet connection temporarily to avoid activation errors.
- Run the activator as an administrator.
- Follow the on-screen instructions to start the activation.
- Wait for the tool to complete the activation process.
- Restart your computer to apply changes.
- Reconnect to the internet and check activation status.
Tip: Always run the activator with administrator rights to avoid permission issues during activation.
Using CMD to Activate Windows 10 for Free
One of the most popular windows activation tricks for Windows 10 is using the Command Prompt (CMD). This method is part of the windows activation tips that many users find helpful. Here’s how you can do it:
- Open Command Prompt as an administrator.
- Enter specific activation commands to trigger the windows activation process.
- Wait for confirmation that Windows has been activated.
- Restart your PC to finalize the activation.
| CMD Command Example | Purpose |
|---|---|
| slmgr /ipk XXXXX-XXXXX | Install a product key |
| slmgr /skms kms.server | Set KMS server for activation |
| slmgr /ato | Activate Windows online |
Using CMD is a quick windows activation utility that does not require additional software.
Activating Windows 11 with Free Windows Activator Tools
Windows 11 users can also benefit from free windows activator tools designed for the latest operating system. The windows activation process for Windows 11 is similar but may require updated activator versions.
- Download a windows activation program compatible with Windows 11.
- Run the tool and follow the activation steps.
- Use windows activation tricks like offline activation if internet access is limited.
- Confirm activation status in system settings.
System Requirements for Running Windows Activation Software
Before using any free windows activator, check if your system meets these basic requirements to avoid errors during the windows activation process:
| Requirement | Details |
|---|---|
| Operating System | Windows 7, 10, or 11 |
| Processor | 1 GHz or faster |
| RAM | Minimum 1 GB for 32-bit, 2 GB for 64-bit |
| Disk Space | At least 16 GB free space |
| Administrator Rights | Required to run activation tools |
| Internet Connection | Optional, depending on activation method |
Ensuring your system meets these requirements helps the windows activation utility work smoothly and effectively.
Frequently Asked Questions About Free Windows Activator
Many people have questions about how to activate Windows using free tools. Understanding the process can help you use these tools safely and effectively. Below are some common questions and answers related to windows activation support, windows activation assistance, windows activation resources, and windows activation guide.
How Do I Activate My Windows for Free?
Activating Windows for free usually involves using special tools that help bypass the need for a paid license. These tools provide windows activation assistance by guiding you through simple steps to unlock full Windows features.
Here’s a basic windows activation guide to follow:
- Download a trusted free windows activator.
- Disable your internet temporarily to avoid activation errors.
- Run the activator with administrator rights.
- Follow the instructions provided by the tool.
- Restart your computer after activation.
Using these steps, you can get windows activation support without needing to buy a product key.
Can I Activate Windows 10 Without a Product Key?
Yes, it is possible to activate Windows 10 without a product key by using certain windows activation resources. These resources include tools that use clever methods to activate Windows by simulating official activation servers or modifying system files.
Keep in mind:
- This method provides windows activation assistance without purchasing a license.
- It is important to follow a reliable windows activation guide to avoid mistakes.
- Some activators work offline, which is helpful if you don’t have internet access.
How to Activate Windows 10 for Free Using CMD?
Using Command Prompt (CMD) is a popular way to activate Windows 10 for free. This method involves typing specific commands that trigger the activation process.
Here is a simple list of commands often used:
| CMD Command | What It Does |
|---|---|
| slmgr /ipk XXXXX-XXXXX | Installs a product key |
| slmgr /skms kms.server | Sets the KMS server for activation |
| slmgr /ato | Activates Windows online |
This approach offers windows activation assistance by allowing users to activate Windows without extra software. It is a handy windows activation resource for those comfortable with command-line tools.
How to Get a Windows 10 Product Key?
If you want to activate Windows 10 officially, you need a product key. Here are some ways to get one:
- Buy a genuine product key from Microsoft or authorized sellers.
- Check if your computer came with a pre-installed Windows license.
- Use a digital license linked to your Microsoft account.
For those who need windows activation support, following a clear windows activation guide is important to enter the product key correctly and activate Windows without issues.
Note: Always use legitimate methods to obtain a product key to ensure your Windows stays genuine and receives updates.

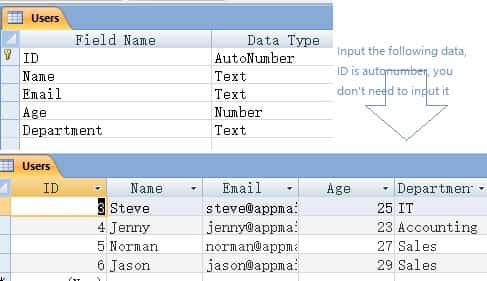 After you input the data, create a form named
 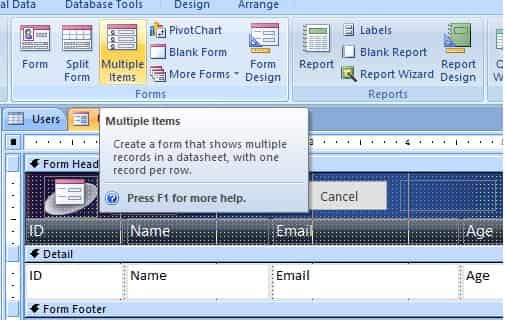 Right click
 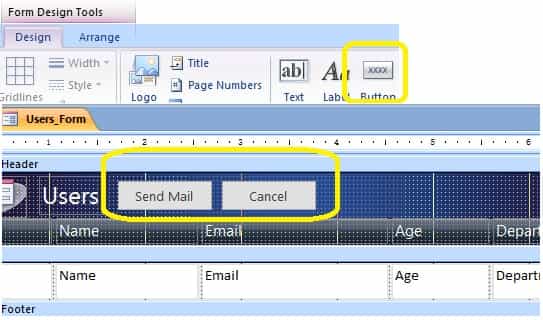 When you put the button on the form, it will popup a dialog box, simply click
 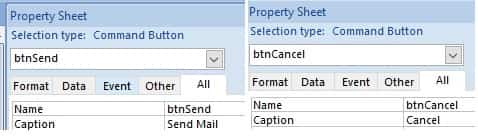 Installation
EASendMail is a SMTP component which supports all operations of SMTP/ESMTP protocols (RFC 821, RFC 822, RFC 2554). Before you can use the following example codes, you should download the
Installation
EASendMail is a SMTP component which supports all operations of SMTP/ESMTP protocols (RFC 821, RFC 822, RFC 2554). Before you can use the following example codes, you should download the 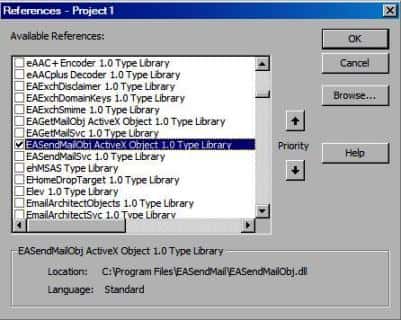 [Access + VBA - Send email - Example]
After the reference is added, click
[Access + VBA - Send email - Example]
After the reference is added, click 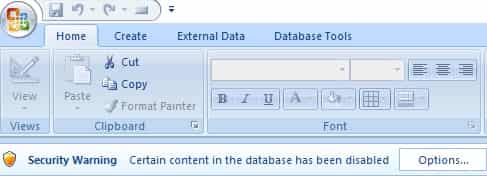 Important
You need to access the Trust Center in the Access Options dialog box. Click the Microsoft Office Button, and then click Access Options. In the Trust Center category, click Trust Center Settings, and then click the Macro Settings category.
' To use the following codes, please download and install
' https://www.emailarchitect.net/webapp/download/easendmail.exe on your machine
Option Compare Database
Private WithEvents oSmtp As EASendMailObjLib.Mail
Private CurrentEmailIsFinished As Boolean
Private HasErrorWithEmail As Boolean
Private ErrorDescription As String
Private CancelSending As Boolean
Private Sub InitVariables()
CurrentEmailIsFinished = True
HasErrorWithEmail = False
ErrorDescription = ""
CancelSending = False
End Sub
Private Sub btnCancel_Click()
btnFocus.SetFocus
btnCancel.Enabled = False
If Not (oSmtp Is Nothing) Then
oSmtp.Terminate
CancelSending = True
CurrentEmailIsFinished = True
End If
End Sub
Private Sub Form_Load()
btnCancel.Enabled = False
btnSend.Enabled = True
btnFocus.TabStop = False
btnFocus.Transparent = True
InitVariables
End Sub
Private Sub btnSend_Click()
btnFocus.SetFocus
btnCancel.Enabled = True
btnSend.Enabled = False
SendMailFromAccess
btnCancel.Enabled = False
btnSend.Enabled = True
End Sub
Private Sub oSmtp_OnAuthenticated()
SysCmd acSysCmdSetStatus, "Authenticated"
End Sub
Private Sub oSmtp_OnClosed()
CurrentEmailIsFinished = True
End Sub
Private Sub oSmtp_OnConnected()
SysCmd acSysCmdSetStatus, "Connected"
End Sub
Private Sub oSmtp_OnError(ByVal lError As Long, ByVal ErrDescription As String)
HasErrorWithEmail = True
CurrentEmailIsFinished = True
ErrorDescription = ErrDescription
End Sub
Private Sub oSmtp_OnSending(ByVal lSent As Long, ByVal lTotal As Long)
SysCmd acSysCmdSetStatus, "Sending " & lSent & "/" & lTotal & " ..."
End Sub
Public Sub SendMailFromAccess()
Dim sender, Name, address, subject, bodyTemplate, body, bodyFormat
bodyFormat = 0 'Text body format
' Please change sender address to yours
sender = "test@emailarchitect.net"
subject = "Test email from MS Access and VBA"
' Use a body template to build body text based on recipient's name
bodyTemplate = "Dear {name}," & Chr(13) & Chr(10) & Chr(13) & Chr(10) & _
"This is a test email from MS Access using VBA, do not reply."
Dim rs, sql
Set rs = CreateObject("ADODB.Recordset")
sql = Me.RecordSource
If Me.FilterOn Then
sql = sql & " WHERE " & Me.Filter
End If
rs.Open sql, CurrentProject.Connection
rs.MoveFirst
Dim emailSent
emailSent = 0
Do While Not rs.EOF
Name = Trim(rs!Name)
address = Trim(rs!Email)
body = Replace(bodyTemplate, "{name}", Name)
If Not SendMailTo(sender, Name, address, subject, body, bodyFormat) Then
Exit Sub
End If
emailSent = emailSent + 1
rs.MoveNext
Loop
SysCmd acSysCmdSetStatus, "Total " & emailSent & " email(s) sent."
End Sub
Function SendMailTo(sender, Name, address, subject, body, bodyFormat)
Set oSmtp = New EASendMailObjLib.Mail
oSmtp.LicenseCode = "TryIt"
' Please change server address, user, password to yours
oSmtp.ServerAddr = "mail.emailarchitect.net"
oSmtp.UserName = "test@emailarchitect.net"
oSmtp.Password = "yourpassword"
' Set server port, if 25 port doesn't work, try to use 587 port
oSmtp.ServerPort = 25
' Using TryTLS,
' If smtp server supports TLS, then TLS connection is used; otherwise, normal TCP connection is used.
' https://www.emailarchitect.net/easendmail/sdk/?ct=connecttype
oSmtp.ConnectType = 4
' If your server is Exchange 2007 or later version, you can use EWS protocol.
' https://www.emailarchitect.net/easendmail/sdk/?ct=protocol
' Set Exchange Web Service Protocol - EWS - Exchange 2007/2010/2013/2016
' oSmtp.Protocol = 1
oSmtp.FromAddr = sender
oSmtp.AddRecipient Name, address, 0
oSmtp.subject = subject
oSmtp.bodyFormat = bodyFormat
oSmtp.BodyText = body
' You can add attachment like this:
' Add attachment from local disk
' If oSmtp.AddAttachment("d:\test.jpg") <> 0 Then
' Application.StatusBar = "Failed to add attachment with error:" & oSmtp.GetLastErrDescription()
' SendMailTo = False
' Exit Function
'End If
SysCmd acSysCmdSetStatus, "Connecting " & oSmtp.ServerAddr & " ..."
oSmtp.Asynchronous = 1
InitVariables
CurrentEmailIsFinished = False
oSmtp.SendMail
Do While Not CurrentEmailIsFinished
' Wait for the email sending, you can do other thing here
DoEvents
Loop
If CancelSending Then
SysCmd acSysCmdSetStatus, "Operation was terminated by user!"
SendMailTo = False
ElseIf HasErrorWithEmail Then
SysCmd acSysCmdSetStatus, "Failed to send email to " & address & "; " & ErrorDescription
SendMailTo = False
Else
SysCmd acSysCmdSetStatus, "Message to " & address & " has been submitted to server."
SendMailTo = True
End If
Set oSmtp = Nothing
End Function
Important
You need to access the Trust Center in the Access Options dialog box. Click the Microsoft Office Button, and then click Access Options. In the Trust Center category, click Trust Center Settings, and then click the Macro Settings category.
' To use the following codes, please download and install
' https://www.emailarchitect.net/webapp/download/easendmail.exe on your machine
Option Compare Database
Private WithEvents oSmtp As EASendMailObjLib.Mail
Private CurrentEmailIsFinished As Boolean
Private HasErrorWithEmail As Boolean
Private ErrorDescription As String
Private CancelSending As Boolean
Private Sub InitVariables()
CurrentEmailIsFinished = True
HasErrorWithEmail = False
ErrorDescription = ""
CancelSending = False
End Sub
Private Sub btnCancel_Click()
btnFocus.SetFocus
btnCancel.Enabled = False
If Not (oSmtp Is Nothing) Then
oSmtp.Terminate
CancelSending = True
CurrentEmailIsFinished = True
End If
End Sub
Private Sub Form_Load()
btnCancel.Enabled = False
btnSend.Enabled = True
btnFocus.TabStop = False
btnFocus.Transparent = True
InitVariables
End Sub
Private Sub btnSend_Click()
btnFocus.SetFocus
btnCancel.Enabled = True
btnSend.Enabled = False
SendMailFromAccess
btnCancel.Enabled = False
btnSend.Enabled = True
End Sub
Private Sub oSmtp_OnAuthenticated()
SysCmd acSysCmdSetStatus, "Authenticated"
End Sub
Private Sub oSmtp_OnClosed()
CurrentEmailIsFinished = True
End Sub
Private Sub oSmtp_OnConnected()
SysCmd acSysCmdSetStatus, "Connected"
End Sub
Private Sub oSmtp_OnError(ByVal lError As Long, ByVal ErrDescription As String)
HasErrorWithEmail = True
CurrentEmailIsFinished = True
ErrorDescription = ErrDescription
End Sub
Private Sub oSmtp_OnSending(ByVal lSent As Long, ByVal lTotal As Long)
SysCmd acSysCmdSetStatus, "Sending " & lSent & "/" & lTotal & " ..."
End Sub
Public Sub SendMailFromAccess()
Dim sender, Name, address, subject, bodyTemplate, body, bodyFormat
bodyFormat = 0 'Text body format
' Please change sender address to yours
sender = "test@emailarchitect.net"
subject = "Test email from MS Access and VBA"
' Use a body template to build body text based on recipient's name
bodyTemplate = "Dear {name}," & Chr(13) & Chr(10) & Chr(13) & Chr(10) & _
"This is a test email from MS Access using VBA, do not reply."
Dim rs, sql
Set rs = CreateObject("ADODB.Recordset")
sql = Me.RecordSource
If Me.FilterOn Then
sql = sql & " WHERE " & Me.Filter
End If
rs.Open sql, CurrentProject.Connection
rs.MoveFirst
Dim emailSent
emailSent = 0
Do While Not rs.EOF
Name = Trim(rs!Name)
address = Trim(rs!Email)
body = Replace(bodyTemplate, "{name}", Name)
If Not SendMailTo(sender, Name, address, subject, body, bodyFormat) Then
Exit Sub
End If
emailSent = emailSent + 1
rs.MoveNext
Loop
SysCmd acSysCmdSetStatus, "Total " & emailSent & " email(s) sent."
End Sub
Function SendMailTo(sender, Name, address, subject, body, bodyFormat)
Set oSmtp = New EASendMailObjLib.Mail
oSmtp.LicenseCode = "TryIt"
' Please change server address, user, password to yours
oSmtp.ServerAddr = "mail.emailarchitect.net"
oSmtp.UserName = "test@emailarchitect.net"
oSmtp.Password = "yourpassword"
' Set server port, if 25 port doesn't work, try to use 587 port
oSmtp.ServerPort = 25
' Using TryTLS,
' If smtp server supports TLS, then TLS connection is used; otherwise, normal TCP connection is used.
' https://www.emailarchitect.net/easendmail/sdk/?ct=connecttype
oSmtp.ConnectType = 4
' If your server is Exchange 2007 or later version, you can use EWS protocol.
' https://www.emailarchitect.net/easendmail/sdk/?ct=protocol
' Set Exchange Web Service Protocol - EWS - Exchange 2007/2010/2013/2016
' oSmtp.Protocol = 1
oSmtp.FromAddr = sender
oSmtp.AddRecipient Name, address, 0
oSmtp.subject = subject
oSmtp.bodyFormat = bodyFormat
oSmtp.BodyText = body
' You can add attachment like this:
' Add attachment from local disk
' If oSmtp.AddAttachment("d:\test.jpg") <> 0 Then
' Application.StatusBar = "Failed to add attachment with error:" & oSmtp.GetLastErrDescription()
' SendMailTo = False
' Exit Function
'End If
SysCmd acSysCmdSetStatus, "Connecting " & oSmtp.ServerAddr & " ..."
oSmtp.Asynchronous = 1
InitVariables
CurrentEmailIsFinished = False
oSmtp.SendMail
Do While Not CurrentEmailIsFinished
' Wait for the email sending, you can do other thing here
DoEvents
Loop
If CancelSending Then
SysCmd acSysCmdSetStatus, "Operation was terminated by user!"
SendMailTo = False
ElseIf HasErrorWithEmail Then
SysCmd acSysCmdSetStatus, "Failed to send email to " & address & "; " & ErrorDescription
SendMailTo = False
Else
SysCmd acSysCmdSetStatus, "Message to " & address & " has been submitted to server."
SendMailTo = True
End If
Set oSmtp = Nothing
End Function