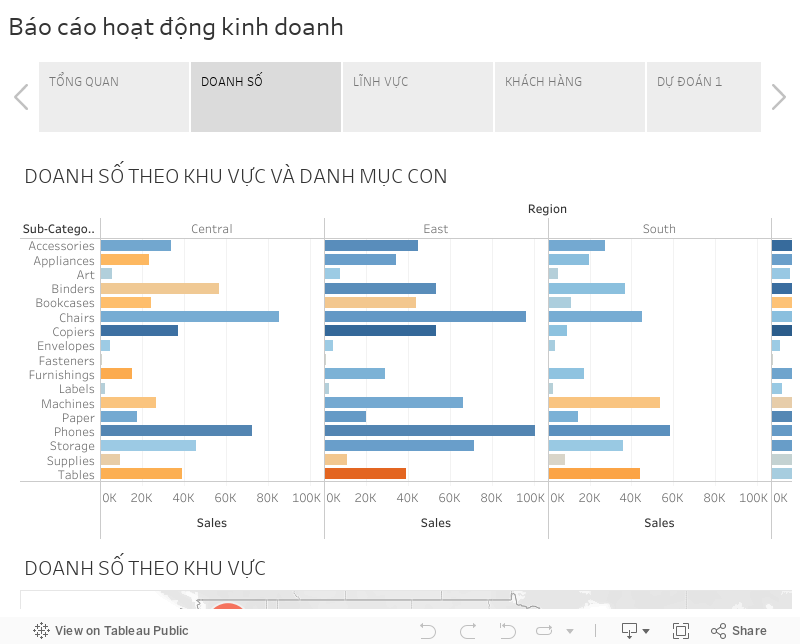
Dự án xây dựng các báo cáo trực quan dữ liệu cho phòng kế hoạch
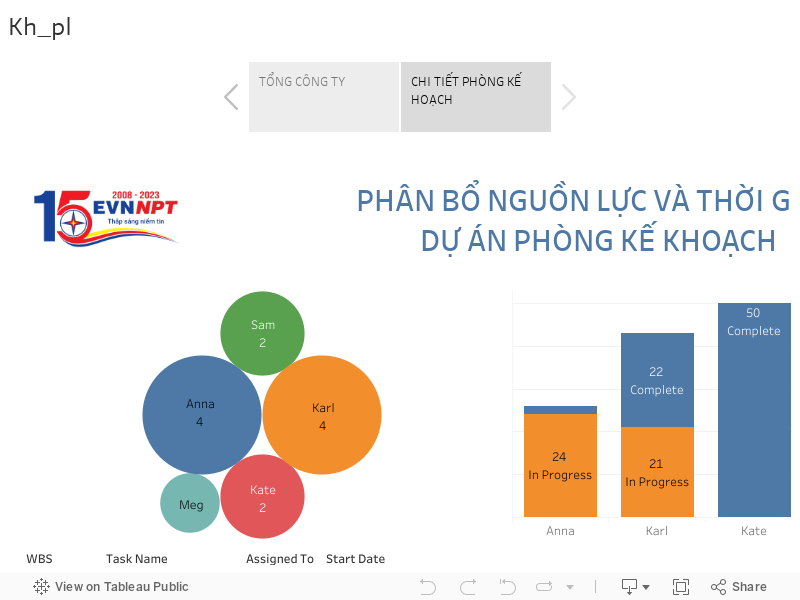
Dự án xây dựng các báo cáo trực quan dữ liệu cho phòng kế hoạch
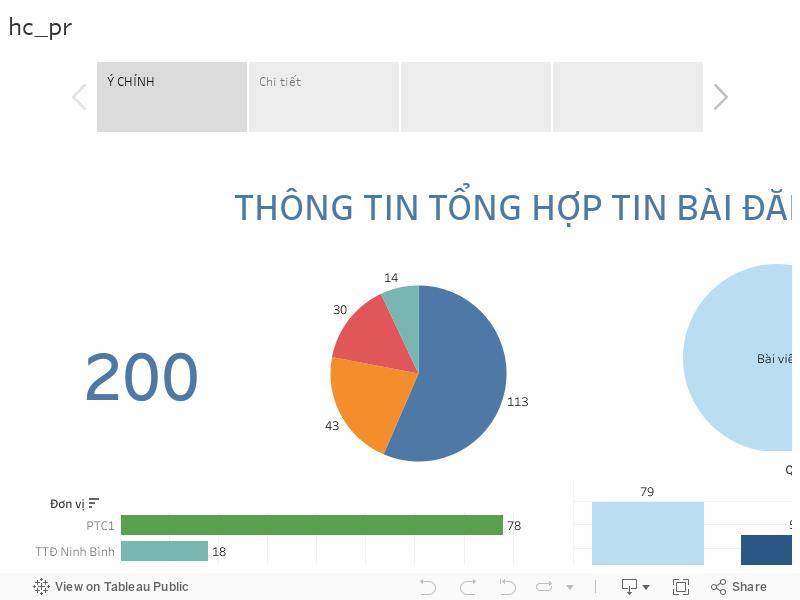
Dự án thực tế từ tổng công ty EVN với bài toán báo cáo phân tích dữ liệu truyền thông theo hoạt động phòng Hành Chính
Sử dụng website https://clipdrop.co/
Để tạo hình ảnh bằng Clipdrop, bạn có thể làm theo các bước sau:
Lưu ý rằng Clipdrop cũng cung cấp các ứng dụng di động trên iOS và Android để bạn có thể tạo hình ảnh trực tiếp trên điện thoại di động của mình. Bạn có thể tìm và tải xuống ứng dụng từ App Store hoặc Google Play Store.
Nếu đăng ký tài khoản Clipdrop miễn phí, bạn sẽ nhận được 400 hình ảnh có hình mờ mỗi ngày và bạn cũng có thể sử dụng các công cụ khác của Clipdrop, như công cụ xóa nền, công cụ nâng cấp hình ảnh và công cụ chỉnh sáng được hỗ trợ bởi AI. Nếu bạn cần nhiều hơn, gói Pro bắt đầu ở mức 9 USD/tháng cho 1.500 hình ảnh không có hình mờ mỗi ngày cộng với khả năng sử dụng không giới hạn hầu hết các công cụ khác của Clipdrop.
Truy cập vào trang web https://dreamstudio.ai.
Trên trang chủ của DreamStudio, bạn sẽ thấy một loạt các ứng dụng và công cụ để tạo hình ảnh.
Tìm và chọn công cụ hoặc ứng dụng mà bạn muốn sử dụng. Ví dụ: “Photo Editor”, “Background Remover”, “Collage Maker”, “Artistic Filters”,…
Khi bạn chọn một công cụ cụ thể, một giao diện hoặc ứng dụng sẽ mở ra.
Theo hướng dẫn trong giao diện hoặc ứng dụng, tải lên hình ảnh mà bạn muốn chỉnh sửa hoặc sử dụng.
Thực hiện các chỉnh sửa hoặc áp dụng các hiệu ứng và bộ lọc tùy chọn cho hình ảnh của bạn.
Khi bạn đã hoàn thành chỉnh sửa, bạn có thể lưu hình ảnh kết quả xuống máy tính hoặc thiết bị của mình.
Nếu bạn sử dụng một ứng dụng di động từ DreamStudio, bạn cũng có thể lưu hình ảnh trực tiếp vào thư viện ảnh của điện thoại hoặc chia sẻ nó trên mạng xã hội.
DreamStudio cung cấp nhiều công cụ và tính năng khác nhau để bạn tạo hình ảnh theo ý thích. Hãy khám phá và tận hưởng quá trình tạo hình ảnh sáng tạo với DreamStudio!
Hạn chế của dreamStudio là chỉ miễn phí 25 ảnh
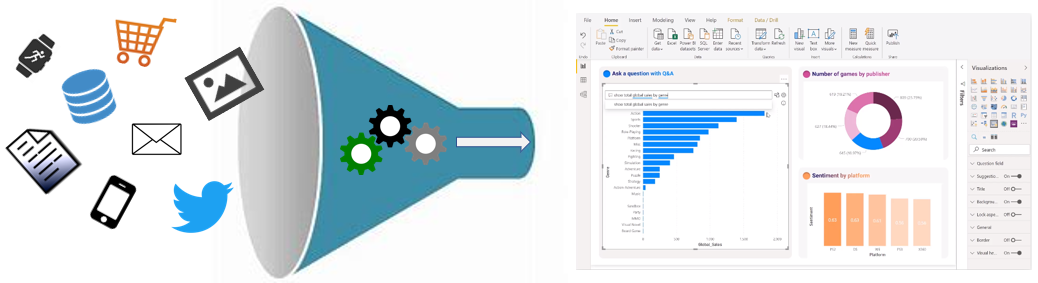
Là một nhà phân tích dữ liệu, bạn cần quan tâm đến về tất cả dữ liệu được tạo ra mỗi ngày và dữ liệu đó có sẵn trong một tổ chức, từ dữ liệu giao dịch trong cơ sở dữ liệu truyền thống, dữ liệu đo từ xa từ các dịch vụ mà bạn sử dụng, đến các tín hiệu mà bạn nhận được từ các lĩnh vực khác nhau như mạng xã hội.
Ví dụ: các doanh nghiệp bán lẻ ngày nay thu thập và lưu trữ một lượng lớn dữ liệu theo dõi các mặt hàng bạn đã nhập và mua, các trang bạn đã truy cập trên trang web của họ, các cách thức bạn mua sản phẩm, thói quen chi tiêu của bạn và hơn thế nữa.
Với dữ liệu và thông tin là tài sản chiến lược nhất của doanh nghiệp, thách thức cơ bản mà các tổ chức có ngày nay là hiểu và sử dụng dữ liệu của họ để tạo ra những thay đổi tích cực trong doanh nghiệp. Các doanh nghiệp tiếp tục phân tích, nghiên cứu để sử dụng dữ liệu của họ một cách có ý nghĩa và hiệu quả, điều này ảnh hưởng đến khả năng ra quyết định hành động kinh doanh của họ.
Một doanh nghiệp bán lẻ phải có thể sử dụng lượng lớn dữ liệu và thông tin của họ theo cách có tác động đến hoạt động kinh doanh, bao gồm:
- Theo dõi hàng tồn kho
- Xác định thói quen mua hàng
- Phát hiện xu hướng và phân loại nhóm người dùng
- Đề xuất – gợi ý mua hàng
- Xác định mức giá tối ưu cho sản phẩm và dịch vụ
- Xác định và ngăn chặn gian lận
Ngoài ra, bạn có thể đang tìm kiếm các sản phẩm dịch vụ giảm giá hàng ngày/ hàng tháng. Ví dụ: các phân đoạn dữ liệu phổ biến mà bạn có thể muốn kiểm tra bao gồm hàng ngày, hàng tuần và hàng tháng để bạn có thể so sánh mức độ bán hàng đã đạt được như thế nào trong cùng một tuần năm ngoái.
Chìa khóa để mở khóa dữ liệu này là có thể kể một câu chuyện với dữ liệu. Trong thế giới kinh doanh có nhịp độ nhanh và cạnh tranh cao ngày nay, việc tạo ra các câu chuyện về báo cáo này giúp các nhà lãnh đạo doanh nghiệp thực hiện đưa ra các quyết định hành động dựa trên dữ liệu. Các nhà ra quyết định kinh doanh phụ thuộc vào một câu chuyện chính xác để đưa ra các quyết định kinh doanh tốt hơn. Một doanh nghiệp có thể đưa ra quyết định chính xác càng nhanh thì họ càng có sức cạnh tranh và càng có lợi thế tốt hơn. Nếu không có câu chuyện, rất khó để hiểu dữ liệu đang muốn nói với bạn điều gì.
Tuy nhiên, chỉ có dữ liệu là không đủ. Bạn cần có khả năng hành động trên dữ liệu để tạo ra sự thay đổi trong doanh nghiệp. Hành động đó có thể liên quan đến việc phân bổ lại các nguồn lực trong doanh nghiệp để đáp ứng nhu cầu, hoặc nó có thể là xác định một chiến dịch thất bại và biết khi nào cần thay đổi hướng đi. Những tình huống này Có thể tìm thấy trong các câu chuyện phân tích dữ liệu bạn mang lại.
Thách thức cơ bản mà các doanh nghiệp phải đối mặt ngày nay là hiểu và sử dụng dữ liệu của họ theo cách có tác động đến hoạt động kinh doanh và cuối cùng là lợi nhuận của họ. Bạn cần có khả năng xem dữ liệu và tạo điều kiện cho các quyết định kinh doanh đáng tin cậy. Sau đó, bạn cần có khả năng xem xét các số liệu và hiểu rõ ràng ý nghĩa đằng sau các số liệu đó.
Yêu cầu này có vẻ khó khăn, nhưng đó là một nhiệm vụ mà bạn có thể hoàn thành. Bước đầu tiên của bạn là hợp tác với các chuyên gia dữ liệu trong tổ chức của bạn, chẳng hạn như kỹ sư dữ liệu và nhà khoa học dữ liệu, để giúp lấy dữ liệu mà bạn cần để xây câu chuyện về dữ liệu. Yêu cầu các chuyên gia này tham gia vào hành trình nghiên cứu phân tích dữ liệu đó với bạn.
Hành trình kể một câu chuyện bằng dữ liệu của bạn cũng liên quan đến việc xây dựng văn hóa dữ liệu đó trong tổ chức của bạn. Trong khi kể chuyện, đảm bảo rằng những câu chuyện được kể đến đúng người. Ngoài ra, hãy đảm bảo rằng mọi người có thể khám phá câu chuyện, rằng họ biết tìm nó ở đâu và đó là một phần của các tương tác thường xuyên.
Phân tích dữ liệu tồn tại để hỗ trợ các doanh nghiệp tìm kiếm thông tin chi tiết và khám phá giá trị tiềm ẩn trong vô số dữ liệu thông qua cách kể chuyện về dữ liệu.Trong khóa học, bạn sẽ học cách sử dụng và áp dụng các kỹ năng phân tích để từ một báo cáo duy nhất bạn có thể tìm ra được các tác động và ảnh hưởng đến tổ chức của bạn.
Option Explicit
‘ Tao chuc nang tim ra DONG cuoi cung
Function LastRow(sh As Worksheet)
On Error Resume Next
LastRow = sh.Cells.Find(What:=”*”, after:=sh.Range(“A1”), Lookat:=xlPart, LookIn:=xlFormulas, SearchOrder:=xlByRows, SearchDirection:=xlPrevious, MatchCase:=False).Row
On Error GoTo 0
End Function
‘ Tao chuc nang tim ra COT cuoi cung
Function Lastcol(sh As Worksheet)
On Error Resume Next
Lastcol = sh.Cells.Find(What:=”*”, after:=sh.Range(“A1”), Lookat:=xlPart, LookIn:=xlFormulas, SearchOrder:=xlByColumns, SearchDirection:=xlPrevious, MatchCase:=False).Column
On Error GoTo 0
End Function
‘ Tao lenh GOPSHEET
Sub Gopsheet()
Dim sh As Worksheet
Dim DestSh As Worksheet
Dim Last As Long
Dim shLast As Long
Dim CopyRng As Range
Dim StartRow As Long
With Application
.ScreenUpdating = False
.EnableEvents = False
End With
‘ XÓA bo sheet TONGHOP neu no da duoc thiet lap
Application.DisplayAlerts = False
On Error Resume Next
ActiveWorkbook.Worksheets(“TONGHOP”).Delete
On Error GoTo 0
Application.DisplayAlerts = True
‘ TAO 1 sheet moi ten TONGHOP
Set DestSh = ActiveWorkbook.Worksheets.Add
DestSh.Name = “TONGHOP”
‘Nhap dong bat dau
StartRow = Application.InputBox(“CHON GOP BAT DAU TU DONG NAO”, “Giangtranvn.com”, 2)
‘ Chay qua tat cac cac sheet va thuc hien copy du lieu vao sheet TONGHOP
For Each sh In ActiveWorkbook.Worksheets
If sh.Name <> DestSh.Name Then
‘ Tim don cuoi cung trong sheet tong hop va sheet thanh phan
Last = LastRow(DestSh)
shLast = LastRow(sh)
‘ Thuc hien copy du kieu khi sheet du lieu KHONG RONG va dong CUOI > dong BAT DAU
If shLast > 0 And shLast >= StartRow Then
‘ thiet lap VUNG can copy
Set CopyRng = sh.Range(sh.Rows(StartRow), sh.Rows(shLast))‘ Kiem tra xem sheet TONGHOP co du dong de copy sang khong
           If Last + CopyRng.Rows.Count > DestSh.Rows.Count Then
              MsgBox "Khong du dong trong bang TONGHOP de copy sang"
              GoTo ExitTheSub
           End If
‘ Copy du lieu o dang GIA TRI
           CopyRng.Copy
           With DestSh.Cells(Last + 1, "A")
               .PasteSpecial xlPasteValues
               .PasteSpecial xlPasteFormats
               Application.CutCopyMode = False
           End With

       End If

   End If
Next
ExitTheSub:
Application.GoTo DestSh.Cells(1)
‘ Tu dong dieu chinh so cot theo sheet TONGHOP
DestSh.Columns.AutoFit
With Application
.ScreenUpdating = True
.EnableEvents = True
End With
End Sub
Send email from MS Access using VBA and SMTP protocol To better demonstrate how to send email using SMTP protocol in Access + VBA, let’s open MS Access, selectblank database, and name it asSample.accdb. Create a table namedUserslike this:After you input the data, create a form named
Users_Fromlike this: Menu ->Create->Multiple ItemsRight click
Users_Form-> Design View, Add two buttons by Design -> SelectButtoncontrol:When you put the button on the form, it will popup a dialog box, simply click
Cancel, then right click the button ->properties, set first button name tobtnSendand Caption toSend Mail, set second button name tobtnCanceland Caption toCancel. Please also add an extra button namedbtnFocus, and put it to anywhere on the form, it is used to help setting focus for other buttons.Installation EASendMail is a SMTP component which supports all operations of SMTP/ESMTP protocols (RFC 821, RFC 822, RFC 2554). Before you can use the following example codes, you should download the EASendMail Installer and install it on your machine at first. Add Reference To use EASendMail SMTP ActiveX Object in VBA project, the first step is “Add reference of EASendMail to your project”. Open VBA IDE by press
Alt+F11, Please select menu ->Tools->References-> and selectEASendMailObj ActiveX Object, clickOK, the reference will be added to current VBA project, and you can start to use it to send email in your project.[Access + VBA - Send email - Example] After the reference is added, click
Form_Users_Fromand input the following codes: Please enable Macro if you closed and re-opened this database, otherwise the codes cannot be executed.Important You need to access the Trust Center in the Access Options dialog box. Click the Microsoft Office Button, and then click Access Options. In the Trust Center category, click Trust Center Settings, and then click the Macro Settings category. ' To use the following codes, please download and install ' https://www.emailarchitect.net/webapp/download/easendmail.exe on your machine Option Compare Database Private WithEvents oSmtp As EASendMailObjLib.Mail Private CurrentEmailIsFinished As Boolean Private HasErrorWithEmail As Boolean Private ErrorDescription As String Private CancelSending As Boolean Private Sub InitVariables() CurrentEmailIsFinished = True HasErrorWithEmail = False ErrorDescription = "" CancelSending = False End Sub Private Sub btnCancel_Click() btnFocus.SetFocus btnCancel.Enabled = False If Not (oSmtp Is Nothing) Then oSmtp.Terminate CancelSending = True CurrentEmailIsFinished = True End If End Sub Private Sub Form_Load() btnCancel.Enabled = False btnSend.Enabled = True btnFocus.TabStop = False btnFocus.Transparent = True InitVariables End Sub Private Sub btnSend_Click() btnFocus.SetFocus btnCancel.Enabled = True btnSend.Enabled = False SendMailFromAccess btnCancel.Enabled = False btnSend.Enabled = True End Sub Private Sub oSmtp_OnAuthenticated() SysCmd acSysCmdSetStatus, "Authenticated" End Sub Private Sub oSmtp_OnClosed() CurrentEmailIsFinished = True End Sub Private Sub oSmtp_OnConnected() SysCmd acSysCmdSetStatus, "Connected" End Sub Private Sub oSmtp_OnError(ByVal lError As Long, ByVal ErrDescription As String) HasErrorWithEmail = True CurrentEmailIsFinished = True ErrorDescription = ErrDescription End Sub Private Sub oSmtp_OnSending(ByVal lSent As Long, ByVal lTotal As Long) SysCmd acSysCmdSetStatus, "Sending " & lSent & "/" & lTotal & " ..." End Sub Public Sub SendMailFromAccess() Dim sender, Name, address, subject, bodyTemplate, body, bodyFormat bodyFormat = 0 'Text body format ' Please change sender address to yours sender = "test@emailarchitect.net" subject = "Test email from MS Access and VBA" ' Use a body template to build body text based on recipient's name bodyTemplate = "Dear {name}," & Chr(13) & Chr(10) & Chr(13) & Chr(10) & _ "This is a test email from MS Access using VBA, do not reply." Dim rs, sql Set rs = CreateObject("ADODB.Recordset") sql = Me.RecordSource If Me.FilterOn Then sql = sql & " WHERE " & Me.Filter End If rs.Open sql, CurrentProject.Connection rs.MoveFirst Dim emailSent emailSent = 0 Do While Not rs.EOF Name = Trim(rs!Name) address = Trim(rs!Email) body = Replace(bodyTemplate, "{name}", Name) If Not SendMailTo(sender, Name, address, subject, body, bodyFormat) Then Exit Sub End If emailSent = emailSent + 1 rs.MoveNext Loop SysCmd acSysCmdSetStatus, "Total " & emailSent & " email(s) sent." End Sub Function SendMailTo(sender, Name, address, subject, body, bodyFormat) Set oSmtp = New EASendMailObjLib.Mail oSmtp.LicenseCode = "TryIt" ' Please change server address, user, password to yours oSmtp.ServerAddr = "mail.emailarchitect.net" oSmtp.UserName = "test@emailarchitect.net" oSmtp.Password = "yourpassword" ' Set server port, if 25 port doesn't work, try to use 587 port oSmtp.ServerPort = 25 ' Using TryTLS, ' If smtp server supports TLS, then TLS connection is used; otherwise, normal TCP connection is used. ' https://www.emailarchitect.net/easendmail/sdk/?ct=connecttype oSmtp.ConnectType = 4 ' If your server is Exchange 2007 or later version, you can use EWS protocol. ' https://www.emailarchitect.net/easendmail/sdk/?ct=protocol ' Set Exchange Web Service Protocol - EWS - Exchange 2007/2010/2013/2016 ' oSmtp.Protocol = 1 oSmtp.FromAddr = sender oSmtp.AddRecipient Name, address, 0 oSmtp.subject = subject oSmtp.bodyFormat = bodyFormat oSmtp.BodyText = body ' You can add attachment like this: ' Add attachment from local disk ' If oSmtp.AddAttachment("d:\test.jpg") <> 0 Then ' Application.StatusBar = "Failed to add attachment with error:" & oSmtp.GetLastErrDescription() ' SendMailTo = False ' Exit Function 'End If SysCmd acSysCmdSetStatus, "Connecting " & oSmtp.ServerAddr & " ..." oSmtp.Asynchronous = 1 InitVariables CurrentEmailIsFinished = False oSmtp.SendMail Do While Not CurrentEmailIsFinished ' Wait for the email sending, you can do other thing here DoEvents Loop If CancelSending Then SysCmd acSysCmdSetStatus, "Operation was terminated by user!" SendMailTo = False ElseIf HasErrorWithEmail Then SysCmd acSysCmdSetStatus, "Failed to send email to " & address & "; " & ErrorDescription SendMailTo = False Else SysCmd acSysCmdSetStatus, "Message to " & address & " has been submitted to server." SendMailTo = True End If Set oSmtp = Nothing End Function
Close VBA IDE and back to Access, double click this form to display the form, and then click Send Mail.
You will see the status and result at Access status bar.

Microsoft Access là một thành phần trong bộ Microsoft Office, cung cấp cho người dùng giao diện thân thiện và các thao tác đơn giản, trực quan trong việc xây dựng và quản trị cơ sở dữ liệu cũng như xây dựng các ứng dụng cơ sở dữ liệu. Người học có thể thực hiện các thao tác thông dụng đối với một hệ quản trị cơ sở dữ liệu thông qua phần mềm Microsoft Access. Biết tạo ra bảng, truy vấn để tìm kiếm thông tin, tạo các biểu mẫu để nhập dữ liệu và tạo các báo cáo kết xuất dữ liệu.
1. Để bắt đầu khóa học. Các bạn vui lòng bấm vào ĐĂNG KÝ thông tin học viên để vào lớp học. Hoặc quét mã QR để đăng ký:

2. Dựa và các TÀI NGUYÊN có sẵn bên dưới. Chúng ta sẽ cùng nhau tìm hiểu và thực hiện yêu cầu của từng buổi học.
Bộ Giáo trình Office
TÀI LIỆU thực hành theo buổi học
4. Sau khi kết thúc khóa học. Các bạn vui lòng thực hiện bài kiểm tra kiến thức sau: – Phần thi lý thuyết: Kiến thức về Access
Phần thi Thực Hành